25/03/2012

Back to basics 100th: Bread Rolls


This is only a tiny self celebration, but while writing the last blog entry, I realised that it was the 99th message, which makes this the 100th post! I know, who cares but me? Well... no one, but I can still make my own little happy dance (and no, you can not see it).
For the news beeing so sad, I think we should cheer and celebrate whatever we can. Like the lovely spring that we are having now, so nice that I could work outside all week end, or that the sun is shining longer in the evening, and also, that this is my 100th post!


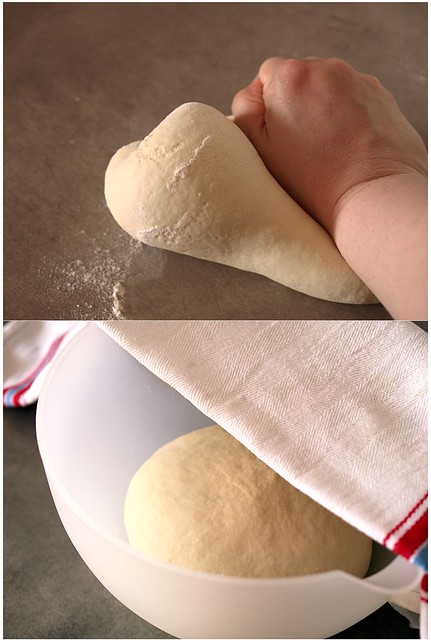
So I thought this post should be really about going back to basics, and one of the basics in my kitchen is making bread. I will never be a real baker, but there's not much that I enjoy more than knitting dough, I can hardly stay more than a week without making some.
If you're lucky enough to have a real baker in your neighbourhood, I hope you're taking advantage of it, because from what I've seen on the ingredients list on a supermarket bread, it sounded more like a chemical experiement than real bread.

Flour, water, salt and yeast. That's bread. Make it fancy, make it simple, give it your own touch or someone else's, but make some, and see the magic happens when it rises, enjoy the smell of it when it's fresh out of the oven. The hardest part might be to wait for it to cool down before savouring it!
Once again, I chose a recipe from the book "Bryn's Kitchen" for the bread recipe, but gave it a mediterrean touch to salute properly the spring.

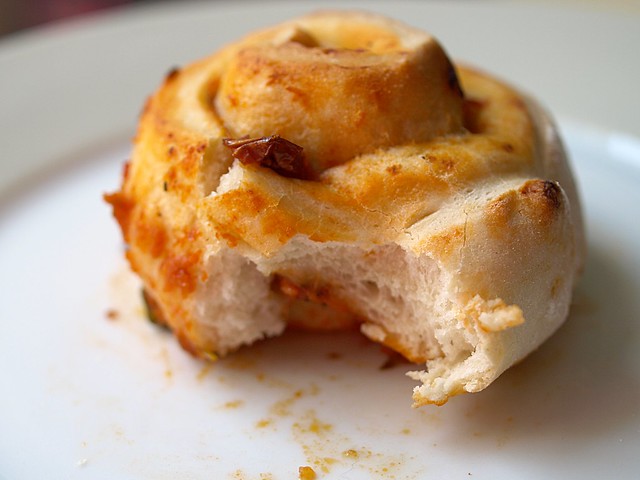
Tomato White Bread Rolls


Makes about 14 rolls

1 Pack of Dry Yeast
250ml of Lukewarm Water
450gr of Flour
2 Teaspoons of Salt
2 Teaspoons of Sugar
2 Teaspoons of Olive Oil
300ml of Tomato Sauce
10 Black Olives, pitted and chopped
6 Dried Tomatoes, chopped
3 Tablespoons of Fresh Basil, chopped

Fill up a measuring cup to 250ml of lukewarm water, and dissolve the yeast in it using a spoon, let it seat for 10 to 15 minutes.

In the bowl of your standmixer, or on your worksurface, combine all dry ingredients and make a well in the middle. Pour in the water and yeast, start slowly to combine. When the dough starts to form, I take it out of the mixer and work it by hand until it's smooth and elastic. The longer you work it, the better it will be, but give it at least 5 minutes.

Place the dough in a bowl, cover it with a clean and damp towel, leave it in a warm place and let it rise for 40 minutes.

Preheat your oven to 180°C

Tip the dough on your floured worksurface, and bring it back to it's original size. Roll it out to a rectangle shape, about 0.5cm thick.

Using a spoon, spread the tomato sauce on the dough evenly, leaving about 4 cm that are not cover on one of the longest side, as it will spread when you roll it. Springle the olives, the dried tomatoes and the basil evenly on the tomato sauce.

Now roll the dough, starting with the longest side where you have spread tomato sauce on, go towards the part that you didn't cover with sauce. Roll carefully, and try to make it as tight as possible.
Using a good knife, cut the dough into about 2cm slices, and place them on a baking tray covered with parchment paper.

Leave the rolls to rise again for about 10 minutes, before baking them for about 20 minutes (maybe less depending on your oven). Leave them to cool on a rack.
Almost right out of the oven is when they are the nicest, but they keep nicely for a couple of days in a clean towel, as the tomato sauce keeps them most.

20/03/2012

Hot beverage for a rainy monday


Technically, I shouldn't like Starbucks. Mainly because I don't like coffee, I have yet to enjoy a sip of the black grown-up beverage (not that I haven't tried it, it's just the enjoying part that did not happen). Secondly it's a big multinational company, with all the bad sides it involves. But I have to admit that I like to go on occasion, mainly when I'm in Lisbon, because of the cakes and pastries they sell, and they do have a few other choices than coffee.

On my last trip to Lisbon, though the temperatures made me feel like it was spring already, I still wanted my hot cup of tea in the end of the afternoon (I'm just realising, how british of me...), but instead of a green or peppermint tea, I though I might try that somehow exotic "chai tea latte" on the list.
And it turned out to be a good idea, given that the milk part was a bit too heavy, and the pepper to present to my taste, but it was definitly a nice surprise.

Conveniently, the last issue of Saveurs magazine (number 190) features a chai tea (or tchaï tea) recipe. I don't have any machine (yet) to steam the milk like at Starbucks, but I've been enjoying the experience of balancing the spices to find a combination I like.
My first change is obviously to switch to soy milk, it's arguebly less "silky" than milk, but so much nicer on my stomach. Then the choice of tea is obviously an important part, I've tried it with the classical english breakfast tea, aswell as with some fruit or flower infusion. I'll just say: go with your mood, because I've enjoyed all the batches I've made.
And you can also drink this on a sunny spring tuesday! ;)

Chai Tea Latte (based on a recipe from Saveurs N°190)


300ml of Soy Milk
1 Teaspoon of Ground Ginger
1 Teaspoon of 4 Spices
2 Bags of English Breakfast Tea
1 Stick of Cinnamon
1 Star Anise
2 Cloves
6 Cardamom Seeds
4 Sichuan Pepper
2 Tablespoons of Honey

In a pan, pour in the milk with all the spices and the tea bags. Place the pan on a low heat with the honey in it.
I'd advice you use a whisk while it eats up, as milk can attached easily to the pan. To me when it starts to bubble a little, it's good to go. You can let it cook a bit longer if you want the flavor to be stronger.

If you want to drink it cold, or even iced, let the spices in and leave to cool. Otherwise pass the milk thru a sieve and enjoy it while it's hot!

16/03/2012

The sun is shining, let's leave the oven off


This belongs to the serie "I should know better by now": this week my mum went to a shop where I only go rarely, but they have a nice organic section and it's one of the only place around here that sells agar-agar (yes, I live in the countryside). So when she told me she was going there, I asked her if she could bring me back a small pack, as I only had a few grams left.

Guess who came back bearing a big triple pack of agar-agar? Yes, my mummy. I wonder if all mums are the same? I guess the great ones are. This is not a first actually, as we are neighbours, we sometimes borrow what we're missing next door, and for a couple of hundred grams of flour she brings me back a whole kilo pack afterwards...(No exaggeration for comical purpose here, this really happens)

So with all the agar-agar I have now, I think it's time to invest in a cookbook that has been on my whishlist for quite some time. But in the meantime, let's go for something sweet, I have cooked enough meat lately. I have been willing to try a cheesecake recipe with no cooking involved, and I bought small individual baking rings for that purpose a few months ago.

Even if it envolves some hammering, I like buying a fresh coconut. Always make sure there still is water in it by shaking it when you buy it. For opening it them, I guess there is no "subtle" method. I use a philips head screwdriver and a hammer to take the water out, and then I place it in a plastic bag and go outside to bang it on the sidewalk, if something got you upset that day, this should take all your frustration out!

No Cooking Fresh Coconut and Lime Cheesecake

For 2 Individual Cheesecakes

1 Coconut
1 Lime
4 Cardamom Seeds
500gr of Cream Cheese (I used a local one, but philadelphia will do)
2 Tablespoon of Brown Sugar
4gr of Agar-Agar
50gr of Ginger and Cinnamon biscuits (Speculoos)
25gr of Butter, melted

Place the biscuits in a plastic bag and crush them with a rolling pin, until you have a thin powder. Place this powder in a bowl, and combine with the melted butter.
Using a baking ring (10cm diameter) line the side with baking paper. Place the ring on a plate and using a spoon, make a layer on the bottom of the crushed biscuit with butter.

Using a pointy object (like a screwdriver) and a hammer, pierce thru at least two of the "eyes" (the black dots) of the coconut to pour the coconut water out in a bowl. Once all the water is out, place the coconut in a plastic bag, and (preferably outside) hit it on a hard surface to break it. With a sharp knife, you can cut out the flesh of the coconut, set it aside.

In a pan, pour the coconut water thru a sieve in it, add the lime zest and the juice aswell. In a pestle and mortar, crush the cardamom seeds to break the shelves, take those out, just leaving some little black seeds, crush those some more in the mortar, before adding them to the pan, with the 2 tablespoons of sugar.
On a medium heat, start warming up that fruit syrop, when it bubble a little, add the agar-agar, and using a whisk, combine everything well until it comes to the boil. Set aside to let it cool a little.

In an other bowl, put your cream cheese and whip it a little, than using a vegetable peeler, add some shave of fresh coconuts (to your taste, but I'd say about 30gr). When the fruit syrop is a little cooler, add it to the cream cheese and combine it with a whip.

Now using a spoon again, fill up your baking ring with the fruit cream cheese and try to make the top even. Place in the fridge for at least 4 hours, but overnight is even better (maybe place some kitchen paper around the ring, as it can lick out some liquid).

Using a sharp knife, go around the ring to release the cheesecake, serve with some lime zest on top.

08/03/2012

A weird day: Cabbage with Pot-au-feu Filling


Happy women's right day to all you ladies out there... I feel weird about writing this to be honest, not that I don't like the idea, but wouldn't it be better if the other 364 days (or 365 this year) would be the same too? But let's not get too political...
It has been a weird day for me, because I have such a busy week my first thought was to enjoy this day off by not doing much, but the "kitchen calling" was too strong and I ended up cooking all afternoon. So I went to the supermarket and got called "Sir" in the cheese section (not the first time this happens...) and 5 minutes later I got a rose from the cashier because it's women's day... go figure... I also went to buy something I rarelly do: meat!

Well the main reason I did this, was because of a cabbage that we got in our weekly vegetables basket. My grandma used to do stuffed cabbage and I liked it a lot, this is most likely nothing like her recipe, but considering the time it takes to make it, it made me feel quite old fashionned.
Making the very emblematic "Pot-au-feu", was also a first for me, not that there is anything complicated about it, it's just not my comfort zone to cook big piece of meat. Plus it is a great "left-over" dish, I used all the meat and vegetables again for the filling, but I know have enough meat broth for quite a while.

So to sum up, this dish took me all afternoon to make, it takes a lot of different preparation (therefor a lot of dishes to wash, and I don't have a dishwasher), it requires some assembling and a bit of dexterity and it's not even "pretty" food once cook. So why bother? Because it's good! Because I know exactly what went in it, because I know it's been done with care and I can share it with the ones I love. That's also what cooking is about.

Cabbage with Pot-au-feu Filling


Serves 6

for the Pot-au-feu

500gr of Beef Brisket
1 Onion
2 Carrots
1 Leek
1/2 a Celery Root
4 Cloves
1 Bay Leaf
Thym
Salt, Pepper

200gr of Pork Belly
2 Slices of Bread
Milk
1 Tablespoon of Ground Coriander
1 Lemon Zested
50gr of Gruyère, grated
Salt, Pepper

In a big pan, place the beef covered with water on a medium heat and bring it to bubble for about 10 minutes. Some foam will surface, take it away with a laddle.
Peel the onion and prick the cloves in it, add it to the pan with the bay leaf, the thym, the salt and pepper, cover it and let it cook for 1 hour.

Peel and cut all the vegetables (carrot, leek, celery) to the same size, about 5 cm long. Add them to the pan and cook for an other hour. When the 2 hours are over, take the meat and the vegetable out and pass the bouillon thru a sieve into bottles.
Cut the meat into small cubes and set aside with the vegetables.

Place the 2 slices of bread into milk to soften them. Cut the pork belly in cubes and in a non-sticky frying pan, cook them with no fat, to a light brown color. Once cooked, place them on kitchen paper to absorb the excess of fat.

Here I've used the grinder accessory to my Kitchenaid with the big holes. Pass both meats, all the vegetables you've cooked with the brisket (including the onion) and the bread that has soaked in the milk.
Add the coriander, the lemon zest and the gruyère. Use your (clean) hands to combine everything very well, check the seasoning and add salt and pepper to your taste. Set aside.

Take the big leaves off the cabbage, one by one and wash them. Bring a big pan of salted water to the boil, place the cabbage leaves carefully in it, you might need to do several batches depending on the size of your pan. Cook the leaves for about 5 minutes, and place them into cold water as soon as you take them out of the hot water.

Now starts the assembling, dry the leaves really well, cut the thickest part of the stem away, place a good tablespoon of filling in the middle of the leave and wrap it like a present. Using a kitchen string tigh it together. This should make about 12.

Heat up a bit of olive oil in a pan (a cast iron for instance), place the cabbage wraps in it to give them a bit of color and then add some meat broth and cook it for about 20 minutes. You can serve it like this, or with mashed potatoes, rice or pasta.

07/03/2012

On the Homemade Vibe: Spaghetti


Far from me the idea of supporting consumerism, but I'm a big enthousiastic when it comes to kitchen utensils, from the smallest item, to something bigger. I believe I have mentionned my Kitchenaid more than once, and how much I love it, so much that I've even named it Nigella, as a tribute to Nigella Lawson.
It is true that it's expensive, but you have to give credit to it's quality, I'm almost using it on a daily basis and it's working like a charm. It makes me think about what my grandma use to say: "the cheapest ends up being the most expensive", and I've realised more than once that grandma was right!

So even if it was a big investment in the first place, it can also help you to save up afterwards: you can make your own bread, no need to buy ready to use whipped cream, just make it yourself. Baking, cooking, grinding, making sausages... The possibility are endless.
Today's recipes is motivated by the fact that I haven't much time to cook this week, and this can be made in advance easily, and also because I had yet to use the spaghetti attachement of my kitchenaid pasta kit.

Not only am I a bit out of time this week to cook, but I didn't even have time to shop, so this is out of the pantry and the freezer. In order to do something different (and also because I was out of regular flour), I mixed two kinds of flours to have something different that the regular pasta recipe.
I froze a small portion of the Arugula Pesto I made last week and it came in handy earlier than expected! When I buy spaghettis I tend to buy them thicker than what the machine is making, but if you're carefull not to overcook them, they have a nice bite to them, and nothing beats the satisfaction of saying: I've made this myself!

Wheat and Rye Flour Spaghettis With Arugula Pesto


Serves 2-3

125gr of Wheat Flour
75gr of Rye Flour
2 Large Eggs
1 Tablespoon of Olive Oil

4 Tablespoons of Arugula Pesto

As the pasta should dry 6 hours, you can make this a day ahead. In a bowl, combine both flours and add the 2 eggs. I use a fork at this stage to combine the two, until it's a little like a crumble, than I tip it on my work surface and start working the dough, for about 10 good minutes.
It needs to be smooth and shiny in the end. About half way thru, I add the olive oil, if the dough seems too dry, you can add some more, it will depend on the size of your eggs.
When you're done, place it in cling film and let it rest for at least 30 minutes.

Cut the dough in four equal pieces, make it a little flat in your hands, and start rolling it into the pasta maker, at the widest setting. Fold the dough in two and pass it again a few time, so the pasta gets the right consistency. Get to thiner setting one step at a time, until you have the wished size.
Place the rolled out dough on a clean towel while you do this again with the 3 remaining pieces of pasta dough.
Now using the spaghetti maker, pass the pasta dough thru, be carefull to keep them aligned and hang them to let them dry (I personnaly use the handles of my kitchen drawers).

In a big pan, bring some salted water to the boil and cook the spaghettis in it for about 5 to 6 minutes, keep a little of the cooking water before draining the spaghettis.
Now place the spaghetti back into the pan, add the arugula pesto aswell as a little bit of cooking water, so the sauce will stick better to the pasta. Eat while it hot.

01/03/2012

So many recipes, So little time


So many recipes out there, only so many meals everyday. Sometimes the maths are a bit tricky to do, I guess it's partly my fault for buying so many magazines and books that provide too many ideas of things I want to try or taste.
Why some recipe get made, and some remain on the "to-do" list for a very long time is actually a bit random. For the recipe I really want to try, I will go out and shop on purpose for them, for some others I just happen to have what is needed at home, some I do because I want to use a ustencil I bought and prove myself I just didn't buy it for no reason.

Today's recipe is bit of all that, I saw it in the latest issue of Zeste magazine, I had the ingredients at hand and it gave me an excuse to use my mandoline. The flavor combination startled me a little and got me curious: potatoes on a pizza, carbs on carbs... why not?
I often have pizza dough in my freezer, as I mostly prepare a big batch and freeze what I don't need. And quite obviously, I always have potatoes in my pantry. As surprising as it might be to people who know me, I have yet to hurt myself with my mandoline (I know I'm jinxing myself by writing this btw), which has proven to be a handy ustencil in my kitchen.

The recipe as it was in the magazine looked good, but I though it was missing something. First a pizza needs cheese, and I was in the mood for some fresh goat cheese. And then, as little as it may be, a little bit of green couldn't do it any harm. My new found love for arugula and the italian theme that was going on, leaded me obviously to a pesto.
I think the flavors combine really well, the arugula gives a nice kick to the dish, and if you don't mind having a garlic breath, this should be on your recipe "to-do" list.

Potato Pizza with Arugula Pesto and Goat Cheese


for the Pizza:

1 Pizza Dough
1 Big Potato
1 Clove of Garlic
Fresh Rosemary
Olive Oil
Salt, Pepper
Fresh Goat Cheese

for the Pesto:

125gr of Arugula
2 Cloves of Garlic
Olive Oil
2 Tablespoons of Walnuts
1 Teaspoon of Spiced Salt

Preheat the oven to 200°C

Wash and peel your potato, slice it very thinly, using a mandoline if you have one, so the slices are regular. Place them in a bowl.
Dice the fresh rosemary, and add it in the bowl, just keep a few needles to decorate in the end. Peel and crush the garlic and add it to the rest.
Now pour about 2 tablespoons of olive oil in the bowl. Add salt and pepper, and with a spoon, try to combine everything and coat the potatoes with the flavors. Set aside.

Roll out your pizza dough on a floured working surface, place it on a lighty oiled tray. Place the potato slices on top into a circle shape, if some oil is left, pour it on the top. Place it in the oven for 22 minutes (depending how thick/thin your pizza dough is).

In the meantime, wash the arugula, the peeled garlic and put them in a blender with the walnuts, start mixing while adding the olive oil. Add the spiced salt, mix it again and check for seasoning, correct to your taste.

When the pizza dough and the potatoes have a nice golden color, take it out of the oven, sprinkle some chunks of fresh goat cheese on top aswell as the rosemary you kept aside and serve with a bit of arugula pesto.